-
 Project Curve Tracer: Visualization Scaffolding
- Date Fri 20 May 2016
- By Jason Jones
- Category curve-tracer
- Tags curve-tracer c curve tracer python project tkinter
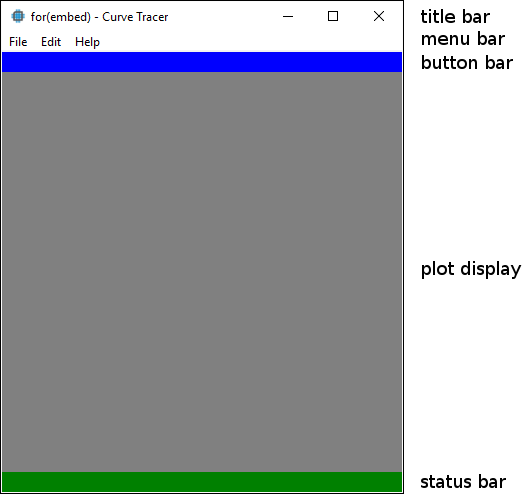
Window Layout
Scaffolding Appearance
As you can see above, the scaffolding of a somewhat more sophisticated is complete and ready to be populated. You may recall that the original visualizer was adequate for the immediate task, but lacked a certain sophistication and control that would be quite nice to have going forward... so we are going to add it!
There are five areas to focus on. In order to make the separation more clear, we have color-coded some areas of the window so that they could be more easily distinguished at this stage. The color is a temporary measure for the initial development that will not last long.
Title Bar
We have customized the title bar with the for(embed) logo and with the name of the application. The standard tkinter feather is cute and all, but just not what we are looking for... at least, so long as it is easy to change.
Menu Bar
The standard menu bar is the staple of any modern UI. We will put most of the options within these menus, although they aren't actually filled out at this point.
Button Bar
Also quite common is a button bar, or 'shortcut' bar. See the blue section. This will be a collection of buttons for quick tasks, such as screenshots or image recall. If anyone knows where I can find some nice free icons - preferably with the MIT license - for the buttons, that would be very helpful. Post in the comments!
Plot Display
This is the primary display area. In the past, this was the only section on the page. Now it will simply
be the area of focus with several other options and information surrounding it. We are going to use the tk.Canvas
class to create a plot. This is the same class that was used previously and, since it is a widget in itself,
it should easily integrate into the larger GUI.
Status Bar
This section will be used to display the serial port status, frequency, mode and perhaps other sections as well.
Scaffolding Code
Fortunately, tkinter allows us to create this layout fairly easily using frames and sizing them.
1 2 3 4 5 6 7 8 9 10 11 12 13 14 15 16 17 18 19 20 21 22 23 24 25 26 27 28 29 30 31 32 33 34 35 36 37 38 39 40 41 42 43 | import tkinter as tk
class CurveTracer(tk.Frame):
def __init__(self, parent):
self.parent = parent
# configure the menus
self.menu_bar = tk.Menu(self.parent)
# create the file menu
self.file_menu = tk.Menu(self.menu_bar, tearoff=0)
self.file_menu.add_command(label='Test')

self.edit_menu = tk.Menu(self.menu_bar, tearoff=0)
self.edit_menu.add_command(label='Select')

self.help_menu = tk.Menu(self.menu_bar, tearoff=0)
self.help_menu.add_command(label='About')
# add the menus to the window
self.menu_bar.add_cascade(label='File', menu=self.file_menu)
self.menu_bar.add_cascade(label='Edit', menu=self.edit_menu)
self.menu_bar.add_cascade(label='Help', menu=self.help_menu)
self.parent.config(menu=self.menu_bar)
# ----------------------------
# configure the high-level frames and add them to the root window
self.shortcut_frame = tk.Frame(self.parent, height=20, width=400, bg='blue')
self.shortcut_frame.pack()

self.plot_frame = tk.Frame(self.parent, height=400, width=400, bg='grey')
self.plot_frame.pack()

self.status_frame = tk.Frame(self.parent, height=20, width=400, bg='green')
self.status_frame.pack()
if __name__ == '__main__':
root = tk.Tk()
root.title("for(embed) - Curve Tracer")
root.iconbitmap('forembed.ico')
app = CurveTracer(root)
root.mainloop()
|
Inline Code
It probably helps to start at the bottom and then go into the CurveTracer class after that. In line 38, we
have a check to ensure that this is the file being run. If it is, then we will execute the remainder
of the lines.
Line 39, root = tk.Tk(), creates our primary window and saves the instance into root. Lines 40
and 41 set the decorations for that window, meaning the title and the window icon.
The next line, app = CurveTracer(root), simply creates an instance of CurveTracer - which is a
tk.Frame, and saves it into app.
Finally, we run the mainloop() method of root, which is required for all tkinter programs.
Classed Code
Next, we will look at the CurveTracer class. Note that the class is a subclass of a tk.Frame.
This means that the CurveTracer class inherits all of the attributes of a tk.Frame right off the bat.
Our strategy is going to be to add the high-level areas to the CurveTracer class that we know that we
will need later. This will make it easier to organize starting out and easier to modify later.
The first think that we want to do is create a menu bar and to flesh out a couple of menus. Most of this is just for the sake of creating the scaffolding for the application, so we are only going to create three menus that we anticipate utilizing and will populate each of those with only one submenu.
self.menu_bar = tk.Menu(self.parent)
First, we create the base menu bar and assign it to the 'parent', which is root (remember way down in line
42 when we supplied root as the parameter to CurveTracer?).
self.file_menu = tk.Menu(self.menu_bar, tearoff=0)
self.file_menu.add_command(label='Test')
self.edit_menu = tk.Menu(self.menu_bar, tearoff=0)
self.edit_menu.add_command(label='Select')
self.help_menu = tk.Menu(self.menu_bar, tearoff=0)
self.help_menu.add_command(label='About')
Next, we create each menu - 'File', 'Edit', and 'Help' - as menus. We can then use the add_command to
attach submenus. Normally, the parameters for add_command would contain a command=function_to_call
parameter, but since we are only creating the visual and not the functional elements at this time, we are
going to leave the command blank for the moment. This just means that the menus won't actually do anything.
self.menu_bar.add_cascade(label='File', menu=self.file_menu)
self.menu_bar.add_cascade(label='Edit', menu=self.edit_menu)
self.menu_bar.add_cascade(label='Help', menu=self.help_menu)
self.parent.config(menu=self.menu_bar)
The last things to do with the menus is to add each 'cascade' to the menu_bar, complete with label using
the add_cascade method. Finally, we add the menu_bar itself to the parent, which is the root window.
If you have gotten through the menus, the frames should be relatively easy. We are going to create each new
frame and pack() that frame so that it is displayed on the parent. One thing to note, going forward. Frames
tend to take the size of their contents unless a width and height is specified. Since our frames are
going to be empty, the frames will automatically be of 0 size. We are going to adjust the colors and sizes in
this exercise, but we eventually expect the height, width, and bg attributes to be unecessary.
self.shortcut_frame = tk.Frame(self.parent, height=20, width=400, bg='blue')
self.shortcut_frame.pack()
self.plot_frame = tk.Frame(self.parent, height=400, width=400, bg='grey')
self.plot_frame.pack()
self.status_frame = tk.Frame(self.parent, height=20, width=400, bg='green')
self.status_frame.pack()
We create each frame of a particular size and cold and simply pack() it. By default, the pack attribute
will pack into the current window vertically.
Why ...
... Tkinter?
Doesn't Tk look bad? Why wouldn't you use something else? Anything else! There is Qt, WX, Kivy, ... why Tkinter?
Well, the most important thing for me was that tkinter comes bundled with Python 3! When I am finished, I would
like to have a file that I can use a compiler on (yes, there are compilers that will compile Python code) and
I could simply provide a *.exe or similar for those who may not have the ability or desire to do a full Python
install just to get the curve tracer to work. I have done a couple of simple GUI interfaces using tkinter - mainly buttons -
that were able to be compiled and execute on platforms that didn't have Python installed.
... not matplotlib?
I like matplotlib. I don't like the install size. Also, I am not sure how well such a library might compile into a native executable. As a result, I'm staying away from third-party libraries in this project as much as possible so that the final result is small and portable. Tk is both.
... are you doing things this way? This is bad software development ...
I am not developing enterprise software with this effort. What I need is for the interface to work easily and be usable by me and other electronics enthusiasts with very little setup time or knowledge required to get going. Additionally, I am completely self-trained and have never worked on a team of software developers that are undergoing similar efforts. The result is that my exposure to various development methods has been from podcasts and Google.
Having said all of that, I would be more than happy to have contributors join and show me all that I'm doing wrong :)
- article
- current-sensor
- curve-tracer
- dispatch
- fan-controller
- fixed-point-math
- load-cell-sensor
- meta
- reference


 RSS
RSS
2
assembly
5
buffer
31
c
3
current sensor
28
curve tracer
2
fan controller
6
fixed-point math
4
interrupt
3
KiCAD
3
labview
5
layout
6
msp430
4
pelican
18
pic24
29
project
12
python
2
Q1.15
4
schematic
10
serial
3
solidworks
2
task manager
2
theme
3
tkinter
9
uart
9
xc16